dom
节点层级
Node 类型
Node
- 所有类型节点继承 Node 类型;
Node API
- Node.ELEMENT_NODE: number 静态属性: 元素节点类型常量(值为 1);
- Node.ATTRIBUTE_NODE: number 静态属性: 属性节点类型常量(值为 2);
- Node.TEXT_NODE: number 静态属性: 文本节点类型常量(值为 3);
- Node.CDATA_SECTION_NODE: number 静态属性: CDATA 节点类型常量(值为 4);
- Node.ENTITY_REFERENCE_NODE: number 静态属性: 实体引用节点类型常量(值为 5);
- Node.ENTITY_NODE: number 静态属性: 实体节点类型常量(值为 6);
- Node.PROCESSING_INSTRUCTION_NODE: number 静态属性: 处理指令节点类型常量(值为 7);
- Node.COMMENT_NODE: number 静态属性: 注释节点类型常量(值为 8);
- Node.DOCUMENT_NODE: number 静态属性: 文档节点类型常量(值为 9);
- Node.DOCUMENT_TYPE_NODE: number 静态属性: 文档类型节点类型常量(值为 10);
- Node.DOCUMENT_FRAGMENT_NODE: number 静态属性: 文档片段节点类型常量(值为 11);
- Node.NOTATION_NODE: number 静态属性: 符号节点类型常量(值为 12);
- Node.prototype.nodeType: number 实例属性: 获取节点类型;
- Node.prototype.nodeName: string 实例属性: 存储节点对应元素标签名;
- Node.prototype.nodeValue: string | null 实例属性: 获取或设置节点值;
- Node.prototype.childNodes: NodeList 实例属性: 存储子节点数组;
- Node.prototype.parentNode: Node | null 实例属性: 存储父节点;
- Node.prototype.previousSibling: Node | null 实例属性: 表示前一个同级节点, 第一个其值为 null;
- Node.prototype.nextSibling: Node | null 实例属性: 表示后一个同级节点, 最后一个其值为 null;
- Node.prototype.firstChild: Node | null 实例属性: 表示第一个子节点;
- Node.prototype.lastChild: Node | null 实例属性: 表示最后一个子节点;
- Node.prototype.hasChildNodes(): boolean 实例方法: 判断是否具有子节点;
- Node.prototype.appendChild(node: Node): Node 实例方法: 在末尾添加子节点;
- Node.prototype.insertBefore(newNode: Node, referenceNode: Node | null): Node 实例方法: 在指定节点前插入新节点;
- Node.prototype.replaceChild(newChild: Node, oldChild: Node): Node 实例方法: 替换子节点;
- Node.prototype.removeChild(child: Node): Node 实例方法: 移除子节点;
- Node.prototype.cloneNode(deep?: boolean): Node 实例方法: 克隆节点, deep 为 true 时深复制;
Document 类型
Document 类型
- 表示整个 HTML 界面;
Document API
- Document.prototype.nodeType: number 实例属性: 值为 9, 表示文档节点;
- Document.prototype.nodeName: string 实例属性: 值为 "#document";
- Document.prototype.documentElement: HTMLElement | null 实例属性: 恒指向 html 标签;
- Document.prototype.body: HTMLElement | null 实例属性: 恒指向 body 标签;
- Document.prototype.title: string 实例属性: 表示 title 标签内容, 可读写;
- Document.prototype.URL: string 实例属性: 表示完整 URL, 只读;
- Document.prototype.domain: string 实例属性: 表示域名, 可读写, 但只能为 URL 的子串;
Element 类型
Element 类型
- 表示 HTML 元素;
Element API
- Element.prototype.nodeType: number 实例属性: 值为 1, 表示元素节点;
- Element.prototype.nodeName: string 实例属性: 标签名(全大写);
- Element.prototype.tagName: string 实例属性: 元素标签名(全大写);
- Element.prototype.id: string 实例属性: 元素 id 属性;
- Element.prototype.className: string 实例属性: 元素 class 属性;
- Element.prototype.classList: DOMTokenList 实例属性: 元素的 class 集合;
- Element.prototype.innerHTML: string 实例属性: 元素内部的 HTML 内容;
- Element.prototype.outerHTML: string 实例属性: 元素及其内部 HTML 内容;
- Element.prototype.textContent: string 实例属性: 元素及其后代的文本内容;
- Element.prototype.getAttribute(qualifiedName: string): string | null 实例方法: 获取属性对应字符串;
- Element.prototype.setAttribute(qualifiedName: string, value: string): void 实例方法: 设置属性;
- Element.prototype.removeAttribute(qualifiedName: string): void 实例方法: 移除属性;
- Element.prototype.hasAttribute(qualifiedName: string): boolean 实例方法: 判断是否具有指定属性;
- Element.prototype.getAttributeNames(): string[] 实例方法: 返回元素所有属性名;
- Document.prototype.createElement(tagName: string): HTMLElement 实例方法: 创建指定标签的元素;
Text 类型
Text 类型
- 表示文本节点;
Text API
- Text.prototype.nodeType: number 实例属性: 值为 3, 表示文本节点;
- Text.prototype.nodeName: string 实例属性: 值为 "#text";
- Text.prototype.nodeValue: string | null 实例属性: 节点中的文本;
- Text.prototype.data: string 实例属性: 文本节点的字符数据;
- Text.prototype.length: number 实例属性: 获取字符数量;
- Text.prototype.appendData(data: string): void 实例方法: 添加文本;
- Text.prototype.deleteData(offset: number, count: number): void 实例方法: 从 offset 开始删除 count 个字符;
- Text.prototype.insertData(offset: number, data: string): void 实例方法: 在 offset 插入 data;
- Text.prototype.replaceData(offset: number, count: number, data: string): void 实例方法: 用 data 替换 [offset, offset + count) 的文本;
- Text.prototype.splitText(offset: number): Text 实例方法: 在 offset 拆分文本, 返回拆分后的新文本节点;
- Text.prototype.substringData(offset: number, count: number): string 实例方法: 提取 [offset, offset + count) 的文本;
- Document.prototype.createTextNode(data: string): Text 实例方法: 创建文本节点;
文本节点数量
- 文本内容的每个元素规定最多只能有一个文本节点;
- 但可以存在多个文本节点;
Comment 类型
- nodeType 为 8;
- nodeName 为
#comment; - nodeValue 为注释内容;
CDATASection 类型
- nodeType 为 8;
- nodeName 为
#cdata-section; - nodeValue 为 CDATA 区块的内容;
DocumentType 类型
- nodeType 为 10;
- nodeName 为文档类型的名称;
- parentNode 值为 Document 对象;
DocumentFragment 类型
- nodeType 为 11;
- nodeName 为
#document-fragment;
Attr 类型
- nodeType 为 2;
- nodeName 为属性名;
- nodeValue 为属性值;
- 一般不使用, 推荐使用 getAttribute(), removeAttribute()和 setAttribute()方法
DOM 编程
动态脚本
let script = document.createElement("script");
script.src = "foo.js";
document.body.appendChild(script);
动态样式
let link = document.createElement("link");
link.rel = "stylesheet";
link.type = "text/css";
link.href = "styles.css";
let head = document.getElementsByTagName("head")[0];
head.appendChild(link);
NodeList 对象
- NodeList 实时反应 DOM 结构;
- 下列代码会永久循环;
let divs = document.getElementsByTagName("div");
for (let i = 0; i < divs.length; ++i) {
  let div = document.createElement("div");
  document.body.appendChild(div);
}
MutationObserver
MutationObserver
- 监控 DOM 变化, 异步执行回调;
MutationObserver API
- MutationObserver(callback: (mutations: MutationRecord[], observer: MutationObserver) => void): MutationObserver 构造函数: 创建 MutationObserver 实例, DOM 变化时异步执行回调;
- MutationObserver.prototype.disconnect(): void 实例方法: 停止观察, 不会终止 MutationObserver 实例, 后续可以重新调用 observe() 开始观察;
- MutationObserver.prototype.observe(target: Node, options?: MutationObserverInit): void 实例方法: 开始观察指定节点;
- MutationObserver.prototype.takeRecords(): MutationRecord[] 实例方法: 获取已检测到但尚未处理的变动记录;
MutationRecord
- 发生变化的 DOM 的元数据;
MutationObserverInit
- 设置观察 DOM 变化的选项;
let observer = new MutationObserver((mutationRecords) =>
  console.log(mutationRecords.map((x) => x.target)),
);
observer.observe(childA, { attributes: true });
observer.disconnect();
IntersectionObserver
IntersectionObserver
- 异步监听多个目标元素与观测元素的交叉状态;
IntersectionObserver API
- IntersectionObserver(callback: (entries: IntersectionObserverEntry[], observer: IntersectionObserver) => void, options?: IntersectionObserverInit): IntersectionObserver 构造函数: 异步监听多个目标元素与视口的交叉状态;
- IntersectionObserver.prototype.observe(target: Element): void 实例方法: 开始观察指定元素;
- IntersectionObserver.prototype.unobserve(target: Element): void 实例方法: 停止观察指定元素;
- IntersectionObserver.prototype.disconnect(): void 实例方法: 停止观察所有元素;
- IntersectionObserver.prototype.takeRecords(): IntersectionObserverEntry[] 实例方法: 获取所有未处理的交叉记录;
IntersectionObserverEntry
- 目标元素的元数据;
IntersectionObserverInit
- IntersectionObserver 的配置选项;
const observer = new IntersectionObserver(callback, options);
const callback = (entries, observer) => {
  entries.forEach((entry) => {
    // ...
  });
};
observer.observe(target);
observer.unobserve(target);
元素查询和元素遍历
元素查询
- Document.prototype.querySelector(selectors: string): Element | null 实例方法: 通过 css 选择符匹配 DOM 元素, 返回第一个满足条件的元素, 未找到返回 null;
- Document.prototype.querySelectorAll(selectors: string): NodeList 实例方法: 通过 css 选择符匹配 DOM 元素, 返回所有元素的 NodeList;
- Element.prototype.matches(selectors: string): boolean 实例方法: 匹配成功返回 true, 反之返回 false;
- Document.prototype.getElementById(elementId: string): HTMLElement | null 实例方法: 通过 id 获取元素;
- Document.prototype.getElementsByClassName(classNames: string): HTMLCollection 实例方法: 通过类名获取元素集合;
- Document.prototype.getElementsByTagName(qualifiedName: string): HTMLCollection 实例方法: 通过标签名获取元素集合;
- Document.prototype.getElementsByName(name: string): NodeList 实例方法: 通过 name 属性获取元素集合;
元素遍历
DOM 属性
- Element.prototype.childElementCount: number 实例属性: 子元素数量 (不包含文本节点);
- Element.prototype.firstElementChild: Element | null 实例属性: 第一个 Element 类型的子元素;
- Element.prototype.lastElementChild: Element | null 实例属性: 最后一个 Element 类型的子元素;
- Element.prototype.previousElementSibling: Element | null 实例属性: 前一个 Element 类型的同级元素;
- Element.prototype.nextElementSibling: Element | null 实例属性: 后一个 Element 类型的同级元素;
NodeIterator
- Document.prototype.createNodeIterator(root: Node, whatToShow?: number, filter?: NodeFilter | null): NodeIterator 实例方法: 创建 NodeIterator 进行深度优先遍历;
- NodeIterator.prototype.nextNode(): Node | null 实例方法: 返回遍历中的下一个节点;
- NodeIterator.prototype.previousNode(): Node | null 实例方法: 返回遍历中的上一个节点;
- NodeIterator.prototype.root: Node 实例属性: 遍历的根节点;
- NodeIterator.prototype.whatToShow: number 实例属性: 过滤器常量, 表示哪些节点类型会被返回;
- NodeIterator.prototype.filter: NodeFilter | null 实例属性: 用于筛选节点的 NodeFilter;
TreeWalker
- Document.prototype.createTreeWalker(root: Node, whatToShow?: number, filter?: NodeFilter | null): TreeWalker 实例方法: 创建 TreeWalker 进行深度优先遍历, 是 NodeIterator 的高级版;
- TreeWalker.prototype.nextNode(): Node | null 实例方法: 返回遍历中的下一个节点;
- TreeWalker.prototype.previousNode(): Node | null 实例方法: 返回遍历中的上一个节点;
- TreeWalker.prototype.parentNode(): Node | null 实例方法: 遍历至当前节点的父节点;
- TreeWalker.prototype.firstChild(): Node | null 实例方法: 遍历至当前节点的第一个子节点;
- TreeWalker.prototype.lastChild(): Node | null 实例方法: 遍历至当前节点的最后一个子节点;
- TreeWalker.prototype.nextSibling(): Node | null 实例方法: 遍历至当前节点的下一个同级节点;
- TreeWalker.prototype.previousSibling(): Node | null 实例方法: 遍历至当前节点的上一个同级节点;
- TreeWalker.prototype.currentNode: Node 实例属性: 当前节点;
- TreeWalker.prototype.root: Node 实例属性: 遍历的根节点;
- TreeWalker.prototype.whatToShow: number 实例属性: 过滤器常量, 表示哪些节点类型会被返回;
- TreeWalker.prototype.filter: NodeFilter | null 实例属性: 用于筛选节点的 NodeFilter;
html5
焦点管理
- Document.prototype.activeElement: Element | null 实例属性: 始终为当前拥有焦点的 DOM 元素;
- Document.prototype.hasFocus(): boolean 实例方法: 检测 document 是否具有焦点;
- HTMLElement.prototype.focus(): void 实例方法: 使元素获得焦点;
- HTMLElement.prototype.blur(): void 实例方法: 使元素失去焦点;
let button = document.getElementById("myButton");
button.focus();
console.log(document.activeElement === button); // true
console.log(document.hasFocus()); // true
滚动
Element.prototype.scrollIntoView(arg?: boolean | { block?: "start" | "center" | "end" | "nearest"; inline?: "start" | "center" | "end" | "nearest"; behavior?: "auto" | "smooth" }): void实例方法: 滚动元素使其可见;
document.forms[0].scrollIntoView({ behavior: "smooth", block: "start" }); // behavior 默认为 auto
HTMLDocument 拓展
- Document.prototype.readyState: "loading" | "interactive" | "complete" 实例属性: 表示文档是否加载完成;
- Document.prototype.compatMode: "CSS1Compat" | "BackCompat" 实例属性: 表示 html 渲染模式;
Document.prototype.head: HTMLElement | null实例属性: 指向<head>元素;- Document.prototype.characterSet: string 实例属性: 表示文档字符集, 如 "UTF-8";
自定义数据属性
- data-xxx 属性: 自定义数据属性, 用于存储自定义数据;
<div id="myDiv" data-appId="12345" data-myname="Nicholas"></div>
插入标记
innerHTML 属性
- 读写所有后代元素的 HTML 字符串;
div.innerHTML = "Hello & welcome, <b>\"reader\"!</b>"
// 等效于下列代码
<div id="content">Hello & welcome, <b>"reader"!</b></div>
outerHTML 属性
- 读写元素及其所有后代元素的 HTML 字符串;
div.outerHTML = "<p>This is a paragraph.</p>";
// 等效于下列代码
let p = document.createElement("p");
p.appendChild(document.createTextNode("This is a paragraph."));
div.parentNode.replaceChild(p, div);
insertAdjacentHTML() 与 insertAdjacentText()
- Element.prototype.insertAdjacentHTML(position: "beforebegin" | "afterbegin" | "beforeend" | "afterend", text: string): void 实例方法: 在指定位置插入 HTML 字符串;
- Element.prototype.insertAdjacentText(position: "beforebegin" | "afterbegin" | "beforeend" | "afterend", text: string): void 实例方法: 在指定位置插入文本;
element.insertAdjacentHTML("beforebegin", "<p>Hello world!</p>");
element.insertAdjacentText("beforebegin", "Hello world!");
安全问题
- innerHTML 会导致 XSS 攻击;
样式
操作元素样式
let myDiv = document.getElementById("myDiv");
// 设置 css 属性
myDiv.style.backgroundColor = "red";
// 读写对应的 css 代码
myDiv.style.cssText = "width: 25px; height: 100px; background-color: green";
// 获取 css 属性值
value = myDiv.style.getPropertyValue(prop);
// 删除 css 属性
myDiv.style.removeProperty("border");
// 迭代  css 属性
for (let i = 0, len = myDiv.style.length; i < len; i++) {
  console.log(myDiv.style[i]); // 或者用 myDiv.style.item(i)
}
操作样式表
// 遍历样式表
let sheet = null;
for (let i = 0, len = document.styleSheets.length; i < len; i++) {
  sheet = document.styleSheets[i];
  console.log(sheet.href);
}
// 操作 css 规则
let sheet = document.styleSheets[0];
let rules = sheet.cssRules || sheet.rules; // 取得规则集合
let rule = rules[0]; // 取得第一条规则
console.log(rule.selectorText); // "div.box"
console.log(rule.style); // CSSStyleDeclaration
// 创建 css 规则
sheet.insertRule("body { background-color: silver }", 0); // 使用 DOM 方法
// 删除 css 规则
sheet.deleteRule(0);
getComputedStyle
- Window.prototype.getComputedStyle(element: Element, pseudoElt?: string): CSSStyleDeclaration 全局方法: 获得指定元素的伪元素(可选)最终使用的 css;
const box = document.getElementById("box");
const style = window.getComputedStyle(box, "after");
const height = style.getPropertyValue("height");
const width = style.getPropertyValue("width");
元素尺寸
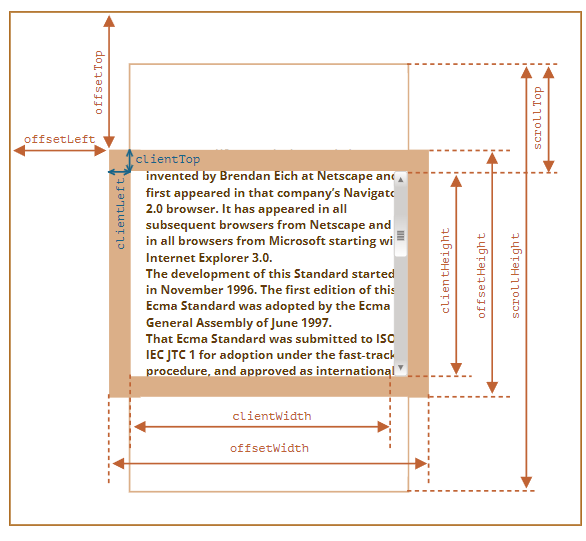
偏移尺寸
- 元素占用的视觉空间, 只读属性;
- 可视 content + padding + border;
- ltrb 为对于 border 到父元素的偏移值;
const left = element.offsetLeft;
const width = element.offsetWidth;
客户端尺寸
- 元素可见内容空间, 只读属性;
- 可视 content + padding;
- ltrb 为对应 border 宽度;
const left = element.clientLeft;
const height = element.clientHeight;
滚动尺寸
- 元素总可见内容空间, 只读属性;
- 总 content + padding;
- ltrb 为可见内容控件的偏移量;
const left = element.scrollLeft;
const width = element.scrollWidth;
客户端存储和滚动尺寸的关系
- 没有滚动条时, 两者相等;
- 具有滚动条时, 滚动偏移量 + 客户端尺寸 = 滚动尺寸;
getBoundingClientRect
- Element.prototype.getBoundingClientRect(): DOMRect 实例方法: 返回 DOMRect 对象, 提供元素位置和尺寸;
- DOMRect.prototype.x: number 实例属性: 元素左边界相对于视口的 x 坐标;
- DOMRect.prototype.y: number 实例属性: 元素上边界相对于视口的 y 坐标;
- DOMRect.prototype.width: number 实例属性: 元素的宽度;
- DOMRect.prototype.height: number 实例属性: 元素的高度;
- DOMRect.prototype.top: number 实例属性: 元素上边界相对于视口顶部的距离;
- DOMRect.prototype.right: number 实例属性: 元素右边界相对于视口左侧的距离;
- DOMRect.prototype.bottom: number 实例属性: 元素下边界相对于视口顶部的距离;
- DOMRect.prototype.left: number 实例属性: 元素左边界相对于视口左侧的距离;
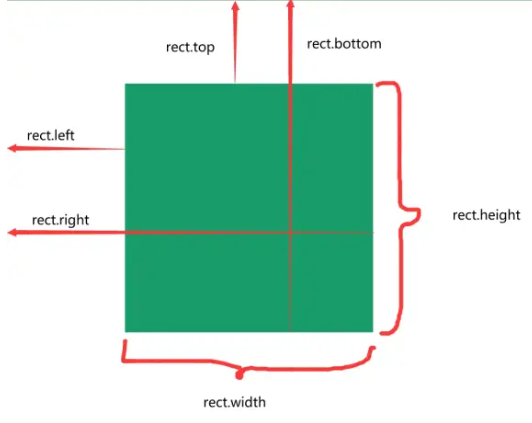
const box = document.getElementById("box");
const rect = box.getBoundingClientRect();
Range
Range
- DOM 范围对象, 表示文档中的一个片段;
Range API
- Document.prototype.createRange(): Range 实例方法: 创建 DOM 范围对象, 表示文档中的一个片段;
- Range.prototype.selectNode(node: Node): void 实例方法: 选择整个节点;
- Range.prototype.selectNodeContents(node: Node): void 实例方法: 选择节点的子节点;
- Range.prototype.startContainer: Node 实例属性: 范围的起始节点;
- Range.prototype.endContainer: Node 实例属性: 范围的结束节点;
- Range.prototype.startOffset: number 实例属性: 范围的起始偏移量;
- Range.prototype.endOffset: number 实例属性: 范围的结束偏移量;
- Range.prototype.commonAncestorContainer: Node 实例属性: 范围的公共祖先容器;
- Range.prototype.setStart(refNode: Node, offset: number): void 实例方法: 设置范围的起始位置;
- Range.prototype.setEnd(refNode: Node, offset: number): void 实例方法: 设置范围的结束位置;
- Range.prototype.setStartBefore(refNode: Node): void 实例方法: 将范围的起始位置设置为 refNode 之前;
- Range.prototype.setStartAfter(refNode: Node): void 实例方法: 将范围的起始位置设置为 refNode 之后;
- Range.prototype.setEndBefore(refNode: Node): void 实例方法: 将范围的结束位置设置为 refNode 之前;
- Range.prototype.setEndAfter(refNode: Node): void 实例方法: 将范围的结束位置设置为 refNode 之后;
- Range.prototype.extractContents(): DocumentFragment 实例方法: 提取范围内容并返回文档片段;
- Range.prototype.deleteContents(): void 实例方法: 删除范围内容;
- Range.prototype.cloneContents(): DocumentFragment 实例方法: 克隆范围内容并返回文档片段;
- Range.prototype.insertNode(node: Node): void 实例方法: 在范围起始位置插入节点;
- Range.prototype.surroundContents(newParent: Node): void 实例方法: 用新节点包围范围内容;
// 创建 DOM 范围对象
let range = document.createRange();
最佳实践
判断元素是否在可视区域
基本原理
- 使用 getBoundingClientRect() API;
- 判断 top/left/bottom/right 和 window.innerHeight/ window.innerWidth 的关系;
- 使用 IntersectionObserver() API;
部分包含
- getBoundingClientRect();
- top > 0 且小于 window.innerHeight, left 同理
- IntersectionObserver();
- intersectionRatio 为 (0, 1);
完全包含
- getBoundingClientRect();
- top > 0 且 bottom < window.innerHeight, left/right 同理
- IntersectionObserver();
- intersectionRatio 为 1;
上拉加载和下拉刷新
上拉加载
- 上拉加载即当前页面触底的动作;
- 判断出发上拉加载的标签的位置;
- 设置一个触发上拉加载的阈值 distance;
- 如果其 scrollTop + clientHeight >= scrollHeight - distance, 触发对应操作;
if (scrollTop + clientHeight >= scrollHeight - distance) {
  console.log("开始加载数据");
}
下拉刷新
- 页面处于顶部, 用户进行下拉刷新;
- 监听 touchstart, touchmove 和 touchend 事件;
- touchstart 记录 y 轴起始位置;
- touchmove 记录 y 轴移动方向;
- 如果向下移动, element 使用 translateY 移动相同距离;
- touchend 触发下拉刷新事件, element translateY 设置为 0;
大数据显示
直接渲染
- 不推荐;
setTimeout 分页渲染
- 首页将数据分为若干页;
- 使用 setTimeout 逐页渲染;
requestAnimationFrame
- 即将 setTimeout 替换为 requestAnimationFrame;
df + requestAnimationFrame
- 文档碎片 + requestAnimationFrame;
- 减少重排和重绘;
- 在内存中进行运算, 减少对真实 DOM 的操作;
懒加载
- 首先进行分页, 在页尾放置一个空节点;
- 使用 getBoundingClientRect 或 IntersectionObserver 观察空节点是否在视图内;
- 若出现在视图内, 在渲染下一页内容;
虚拟列表
- 见虚拟列表;
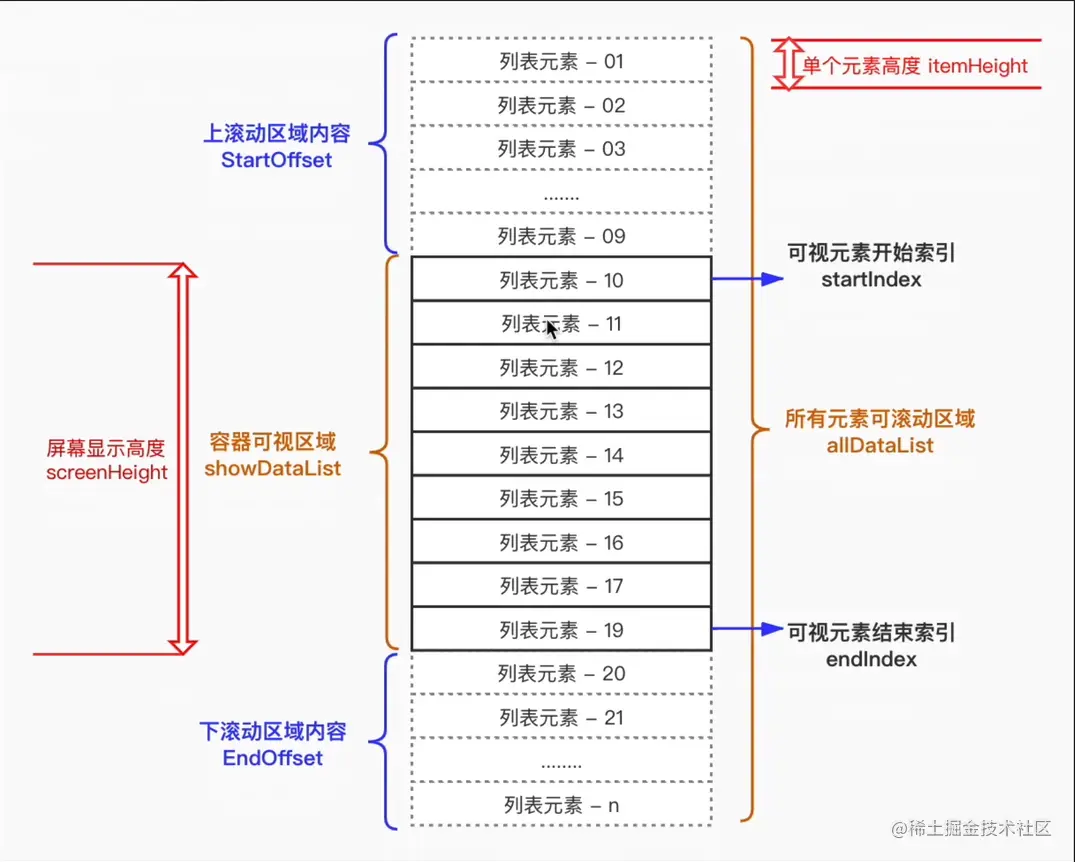
虚拟列表
虚拟列表
- 根据可视区域和列表内容;
- 监听用户滚动事件, 动态截取部分列表内容渲染到页面上;
实现机制
- 固定可视区高度 showHeight 和列表子项高度 itemHeight;
- 计算起始位置和终止位置索引;
- 计算索引时可设置一个缓存值, 避免滑动效果卡顿;
- 计算可视区列表起始索引 start;
- start = Math.floor(scrollTop/itemHeight) - buffer;
- 计算可视区列表终止索引 end;
- end = start + Math.ceil(showHeight/itemHeight) + buffer;
- 监听滚动事件, 根据起始和终止索引, 渲染部分列表内容;
- 列表元素使用 absolute 布局;
- 根据 startIndex 设置 top;
- 对应回调函数使用节流机制, 避免频繁渲染;